Use dWeb toolkits to develop DApp
Part1: Deploying Applications to Akash Decloud Processes
Akash is a platform for decentralized containerized application deployment. The FanNFT application I built has an automatic schedule runner that needs to be deployed using Akash's unique server-side container runner capability in instead of renting a traditional cloud server. This article describes my Akash service deployment process.
Preparation
Akash CLI:Installation After completing the installation, enter the following command to display the version number to indicate that the installation is complete
$ akash version
v0.12.2-rc5
6 $AKT: $AKT is a circulating coin on the Akash platform and requires a deposit of 5AKT for deployment and an additional 1AKT for the gas fee, about $20 in total. It can be exchanged for other cosmos assets from osmosis or from AscendEX, Gate.io, Bittrex
Docker:Installation After completing the installation, enter the below command to display the version number to confirm that the installation is complete
$ docker version
Client:
 Version:           20.10.2
Analysis
When completing the writing of the code for the service and preparing it for deployment, the following issues need to be considered:
- the runtime environment of the service
- resources required (CPU, memory, storage)
- dependencies between services
- exposed ports
In the case of FanNFT, the core running code is as follows:
# source code: https://github.com/script-money/FanNFT/blob/main/api/main.py

def periodic(period):
    def scheduler(fcn):
        async def wrapper(*args, **kwargs):
            while True:
                asyncio.create_task(fcn(*args, **kwargs))
                await asyncio.sleep(period)
        return wrapper
    return scheduler


@periodic(300)  # 5 minutes
async def main():
    # omitted

if __name__ == "__main__":
    asyncio.run(main())
I write an asynchronous scheduler in Python to implement fetching Twitter API data every 5 minutes and sending transactions to the smart contract.
- the runtime environment of the service: The service works on Python 3.9, the run command is
python main.py, and the environment variable.envneeds to be added - resources required (CPU, memory, storage): It's just a script that interacts with the contract at regular intervals and basically takes little computing and storage resources
- dependencies between services: No other dependencies
- exposed ports: No need to expose ports
write Dockerfile
If you are not clear how Docker works, it is recommended to learn how to write a Dockerfile, there are many tutorials on the Google.
My dockerfile like below. Just as other python program, use pip install requirements and python main.py to run.
FROM python:3.9-buster

# Prepare environment
RUN mkdir -p /FanNFT/api

# Setup ENV
ENV TZ Asia/Shanghai

# Install dependencies
COPY . /FanNFT/api
RUN cp -r /FanNFT/api/cadence /FanNFT
WORKDIR /FanNFT/api
RUN  pip install --user --no-cache-dir -r requirements.txt

# Run code
CMD ["python","main.py"]
Push the Container
Once the Dockerfile is complete, use docker build to build the image. The package depends on the cadence folder outside the project folder, the username to register dockerhub is scriptmoney, the version number is 0.2.1, so the command I use is
# source code: https://github.com/script-money/FanNFT/blob/main/api/build.sh
cp -r ../cadence .
docker build -t scriptmoney/fannft:0.2.1 \
--no-cache .
rm -rf cadence
After the build is done, upload it with docker push [image name:tag]. I use docker build -t scriptmoney/fannft:0.2.1 --no-cache .
write SDL
SDL is the file defines the resources needed for deployment, and it is a good choice to modify it from the official documentation multi-tier-app.
---
version: "2.0"

services:
  redis:
    image: bitnami/redis:6.2
    env:
      - REDIS_AOF_ENABLED=no
      - ALLOW_EMPTY_PASSWORD=yes
    expose:
      - port: 6379
        to:
          - service: goosebin
  goosebin:
    image: hydrogen18/goosebin:latest
    env:
      - REDIS_HOST=redis
      - REDIS_PORT=6379
      - PASTE_SIZE_LIMIT=100000
      - HTTP_PORT=8000
    depends_on:
      - redis
    expose:
      - port: 8000
        as: 80
        to:
          - global: true

profiles:
  compute:
    redis:
      resources:
        cpu:
          units: 1
        memory:
          size: 128Mi
        storage:
          size: 16Mi
    goosebin:
      resources:
        cpu:
          units: 1
        memory:
          size: 64Mi
        storage:
          size: 16Mi
  placement:
    dc1:
      pricing:
        redis:
          denom: uakt
          amount: 9999
        goosebin:
          denom: uakt
          amount: 9999

deployment:
  redis:
    dc1:
      profile: redis
      count: 1
  goosebin:
    dc1:
      profile: goosebin
      count: 1
The first is to modify the service, the sample is two services, redis running on port 6379, exposed to goosebin. goosebin depends on redis, globally exposed internal ports 8000 to 80 to provide services. There are also some environment variable settings.
My program, based on the previous analysis, has no other dependent services and does not need to expose ports, so
services:
-  redis:
-    image: bitnami/redis:6.2
-    env:
-      - REDIS_AOF_ENABLED=no
-      - ALLOW_EMPTY_PASSWORD=yes
-    expose:
-      - port: 6379
-        to:
-          - service: goosebin
-  goosebin:
+  fannft
-    image: hydrogen18/goosebin:latest
+    image: scriptmoney/fannft:0.2.1
    env:
-      - REDIS_HOST=redis
-      - REDIS_PORT=6379
-      - PASTE_SIZE_LIMIT=100000
-      - HTTP_PORT=8000
+      - TESTNET_ADDRESS=[fill your env]
+      - TESTNET_PRIVATE_KEY=[fill your env]
+      - CONSUMER_KEY=[fill your env]
+      - CONSUMER_SECRET=[fill your env]
+      - ACCESS_TOKEN_KEY=[fill your env]
+      - ACCESS_TOKEN_SECRET=[fill your env]
-    depends_on:
-      - redis
    expose:
      - port: 8000
        as: 80
        to:
          - global: true
The name of the service can be self-defined, mine is fannft. The image should be a dockerhub image. env is filled in according to the service's specifics. Mine is used to fill in the public and private keys and the Twitter API key. I didn't change expose because my service doesn't need to expose a port, so I just fill in a random one.
Then modify the compute, choose according to the service consuming resources, you can refer akashlytics to set it, the URL provides 4 scales of configuration as well as the price, my service barely consumes resources, so I use the lowest 1uakt configuration. (It doesn't actually use that kind of resources though 🤣)
profiles:
  compute:
-    redis:
-      resources:
-        cpu:
-          units: 1
-        memory:
-          size: 128Mi
-        storage:
-          size: 16Mi
-    goosebin:
+    fannft:
      resources:
        cpu:
          units: 0.1
        memory:
-          size: 64Mi
+          size: 512Mi
        storage:
-          size: 16Mi
+          size: 512Mi
Modify the placement, set the service provider's information and the price to be paid. placement name can be set arbitrarily, I used Equinix. the service provider's attributes and signedBy can be queried via the command line, as will be mentioned later, but it can be set to host: akash, and signedBy can be left unset. The price paid is set to 1uakt according to akashlytics, which is equal to 0.000001 AKT for a block, and costs less than 0.5 AKT a month.
  placement:
-    dc1:
+    equinix:
+      attributes:
+        host: akash
+      signedBy:
+       anyOf:
+        - "akash1365yvmc4s7awdyj3n2sav7xfx76adc6dnmlx63"
      pricing:
-        redis:
-          denom: uakt
-          amount: 9999
-        goosebin:
+        fannft
          denom: uakt
-          amount: 9999
+          amount: 1
Finally, set the deployment, the name is recommended to be the same as the name of the service, and add the name of the placement, the profile is filled with the name of the service, and the number of deployed instances is set to 1. If you need high availability or load balancing, you can set multiple instances.
deployment:
-  redis:
-    dc1:
-      profile: redis
-      count: 1
-  goosebin:
+  fannft:
-    dc1:
+    equinix:
-      profile: goosebin
+      profile: fannft
      count: 1
You can find modified complete yaml at deploy.example.yaml
More references: Akash sdl office Docs
Deploy to Akash
I usually write a .sh file, put all the commands in it, uncomment which one I use, and repeat with sh deploy.sh to run it.
Create a new deploy.sh and fill in the following content
#!/bin/zsh
AKASH_NODE="http://135.181.181.120:28957"
AKASH_CHAIN_ID="akashnet-2"
ACCOUNT_ADDRESS="replace with your akash address"
KEY_NAME="test"
KEYRING_BACKEND="os"
DEPLOY_YML=deploy.yaml
FEES=500uakt

TX="write tx want to query"
PROVIDER=
DSEQ=
GSEQ=1
OSEQ=1
If the above params are not available, refer to the official documentation and fill in the newest ones.
If you don't have an account, you need to create one first. In deploy.sh, add the command to create an account
OSEQ=1
+
+ # generate account
+ akash --keyring-backend "$KEYRING_BACKEND" keys add "$KEY_NAME"
Then sh deploy.sh, the output will appear as follow
- name: test
  type: local
  address: akash1z4y4rdgr5f2hzp0aaq304jj5wy4qgwazrw25qx
  pubkey: akashpub1addwnpepqt3hvwt0dd3gsq5crljdm2xmpjs8rrrtxg4e4xgt4l2h72wcze3kzczz6ll
  mnemonic: ""
  threshold: 0
  pubkeys: []


**Important** write this mnemonic phrase in a safe place.
It is the only way to recover your account if you ever forget your password.

hello frog crisp glide quote good sugar model ridge genuine nothing spider seed unlock spike favorite focus saddle stamp detail trash enemy wheat lumber
The last two lines are mnemonics and need to be saved. Then fill in the third line with the address deploy.sh.
AKASH_CHAIN_ID="akashnet-2"
- ACCOUNT_ADDRESS="replace with your akash address"
+ ACCOUNT_ADDRESS="akash1z4y4rdgr5f2hzp0aaq304jj5wy4qgwazrw25qx"
KEY_NAME="test"
You will then need to transfer 6 AKT to that address and fill in the account query instructions.
- akash --keyring-backend "$KEYRING_BACKEND" keys add "$KEY_NAME"
+ # akash --keyring-backend "$KEYRING_BACKEND" keys add "$KEY_NAME"
+
+ # query account balance
+ akash query bank balances --node $AKASH_NODE $ACCOUNT_ADDRESS
Run sh deploy.sh If the following message appears, the transfer was successful.
balances:
- amount: "6000000"
  denom: uakt
pagination:
  next_key: null
  total: "0"
The next step is to create the certifications by typing in the following commands
- akash query bank balances --node $AKASH_NODE $ACCOUNT_ADDRESS
+ # akash query bank balances --node $AKASH_NODE $ACCOUNT_ADDRESS
+
+ # create certifications
+ akash tx cert create client --chain-id $AKASH_CHAIN_ID --keyring-backend $KEYRING_BACKEND --from $KEY_NAME --node=$AKASH_NODE --fees $FEES
Run sh deploy.sh, in the middle it will prompt confirm transaction (Mac will also pop up KeyChain settings), type y and then Enter. The following output will appear. You only need to create authentication once for a single address to use the platform, and no further authentication is required for any subsequent deployments.
no certificate found for address akash1z4y4rdgr5f2hzp0aaq304jj5wy4qgwazrw25qx. generating new...
{"body":{"messages":[{"@type":"/akash.cert.v1beta1.MsgCreateCertificate...

confirm transaction before signing and broadcasting [y/N]: y
{"height":"1747075","txhash":"12EA80B302F687454C6FD9BA5F389B51009801B621FC7475BE8074244DBD7...
You can use the following command to query the certificate status, when state: valid appears, it means the certificate is prepared
- akash tx cert create client --chain-id $AKASH_CHAIN_ID --keyring-backend $KEYRING_BACKEND --from $KEY_NAME --node=$AKASH_NODE --fees $FEES
+ # akash tx cert create client --chain-id $AKASH_CHAIN_ID --keyring-backend $KEYRING_BACKEND --from $KEY_NAME --node=$AKASH_NODE --fees $FEES
+
+ # query certification status
+ akash query cert list --owner $ACCOUNT_ADDRESS --node=$AKASH_NODE
To create a deployment, you need to deposit 5AKT
- akash query cert list --owner $ACCOUNT_ADDRESS --node=$AKASH_NODE
+ # akash query cert list --owner $ACCOUNT_ADDRESS --node=$AKASH_NODE
+
+ # send deployment create transaction
+ akash tx deployment create $DEPLOY_YML --from $KEY_NAME --node $AKASH_NODE --chain-id $AKASH_CHAIN_ID --fees $FEES -y
Then query all available bids for the current user
- akash tx deployment create $DEPLOY_YML --from $KEY_NAME --node $AKASH_NODE --chain-id $AKASH_CHAIN_ID --fees $FEES -y
+ # akash tx deployment create $DEPLOY_YML --from $KEY_NAME --node $AKASH_NODE --chain-id $AKASH_CHAIN_ID --fees $FEES -y
+
+ # query bid
+ akash query market bid list --owner $ACCOUNT_ADDRESS --node $AKASH_NODE --state open
Output will be like below
bids:
- bid:
    bid_id:
      dseq: "1747223"
      gseq: 1
      oseq: 1
      owner: akash1z4y4rdgr5f2hzp0aaq304jj5wy4qgwazrw25qx
      provider: akash10cl5rm0cqnpj45knzakpa4cnvn5amzwp4lhcal
    created_at: "1747226"
    price:
      amount: "1"
      denom: uakt
    state: open
  escrow_account:
    balance:
      amount: "50000000"
      denom: uakt
    id:
      scope: bid
      xid: akash1z4y4rdgr5f2hzp0aaq304jj5wy4qgwazrw25qx/1747223/1/1/akash10cl5rm0cqnpj45knzakpa4cnvn5amzwp4lhcal
    owner: akash10cl5rm0cqnpj45knzakpa4cnvn5amzwp4lhcal
    settled_at: "1747226"
    state: open
    transferred:
      amount: "0"
      denom: uakt
pagination:
  next_key: null
  total: "0"
Fill deploy.sh with PROVIDER and DSEQ of bid_id
TX="write tx want to query"
- PROVIDER=
- DSEQ=
+ PROVIDER=akash10cl5rm0cqnpj45knzakpa4cnvn5amzwp4lhcal
+ DSEQ=1747223
See if the deployment is running, with state: open at the end means it is on. This command also allows you to see the other status of the deployment, such as the balance (not enough balance to recharge).
- akash query market bid list --owner $ACCOUNT_ADDRESS --node $AKASH_NODE --state open
+ # akash query market bid list --owner $ACCOUNT_ADDRESS --node $AKASH_NODE --state open
+
+ # verify the deployment is runing
+ akash query deployment get --owner $ACCOUNT_ADDRESS --node $AKASH_NODE --dseq $DSEQ
The command send to create a lease
- akash query deployment get --owner $ACCOUNT_ADDRESS --node $AKASH_NODE --dseq $DSEQ
+ # akash query deployment get --owner $ACCOUNT_ADDRESS --node $AKASH_NODE --dseq $DSEQ
+
+ # create lease
+ akash tx market lease create --provider $PROVIDER --dseq $DSEQ --gseq $GSEQ --oseq $OSEQ --node $AKASH_NODE --owner $ACCOUNT_ADDRESS --from $KEY_NAME --chain-id $AKASH_CHAIN_ID --fees $FEES -y
If failed to execute message; message index: 0: bid not open appears, the operation is probably too slow and the deployment needs to be closed and recreated. The command to close the deployment is:
# close deployment
akash tx deployment close --node $AKASH_NODE --chain-id $AKASH_CHAIN_ID --gas 500000 --dseq $DSEQ --owner $ACCOUNT_ADDRESS --from $KEY_NAME --fees $FEES -y
Then sent the manifest and the output status: PASS indicates success
- akash tx market lease create --provider $PROVIDER --dseq $DSEQ --gseq $GSEQ --oseq $OSEQ --node $AKASH_NODE --owner $ACCOUNT_ADDRESS --from $KEY_NAME --chain-id $AKASH_CHAIN_ID --fees $FEES -y
+ # akash tx market lease create --provider $PROVIDER --dseq $DSEQ --gseq $GSEQ --oseq $OSEQ --node $AKASH_NODE --owner $ACCOUNT_ADDRESS --from $KEY_NAME --chain-id $AKASH_CHAIN_ID --fees $FEES -y
+
+ # send manifest
+ akash provider send-manifest $DEPLOY_YML --from $KEY_NAME --home ~/.akash --node $AKASH_NODE --dseq $DSEQ --provider $PROVIDER
At this moment the service should have started successfully. If it is a web application, you can query the web address with the following command
# query service information
akash provider lease-status --node $AKASH_NODE --from $KEY_NAME --dseq $DSEQ --home ~/.akash --provider $PROVIDER
If the service is not working as expected, you can use the following commands to view detailed deployment information and container running logs
# Query the log of container creation for locating problems
akash provider lease-events --node $AKASH_NODE --from $KEY_NAME --dseq $DSEQ --home ~/.akash --provider $PROVIDER

# Query the logs of the container run to see the program status, similar to docker logs
akash provider lease-logs --node $AKASH_NODE --from $KEY_NAME --dseq $DSEQ --home ~/.akash --provider $PROVIDER
If SDL service is modified, such as updating the image, you can use the following command to update the deployment without changing the address. However, if there are updates to profiles and deployments, they must be redeployed.
akash tx deployment update $DEPLOY_YML --dseq $DSEQ --from $KEY_NAME --owner $ACCOUNT_ADDRESS --node $AKASH_NODE --chain-id $AKASH_CHAIN_ID --fees $FEES -y
Sometimes sending a transaction will not be include in block, you can add -broadcast-mode sync to the command, it will broadcast the output tx immediately, then use
-akash query tx $TX --node "$AKASH_NODE" --chain-id $AKASH_CHAIN_ID to query the status of the transaction
Other commands are not commonly used and can be found in akash --help and the official documentation.
The complete command is as follows deploy.example.sh
#!/bin/zsh
AKASH_NODE="http://135.181.181.120:28957"
AKASH_CHAIN_ID="akashnet-2"
ACCOUNT_ADDRESS="replace with your akash address"
KEY_NAME="test"
KEYRING_BACKEND="os"
DEPLOY_YML=deploy.yaml
FEES=500uakt

TX="write tx want to query"
PROVIDER=akash10cl5rm0cqnpj45knzakpa4cnvn5amzwp4lhcal
DSEQ=1747444
GSEQ=1
OSEQ=1

# generate account 生成账户
# akash --keyring-backend "$KEYRING_BACKEND" keys add "$KEY_NAME"

# query account balance 查询账户余额
# akash query bank balances --node $AKASH_NODE $ACCOUNT_ADDRESS

# create certifications 创建认证
# akash tx cert create client --chain-id $AKASH_CHAIN_ID --keyring-backend $KEYRING_BACKEND --from $KEY_NAME --node=$AKASH_NODE --fees $FEES

# query certification status 查询认证状态
# akash query cert list --owner $ACCOUNT_ADDRESS --node=$AKASH_NODE

#  send deployment create transaction 发起部署创建的交易
# akash tx deployment create $DEPLOY_YML --from $KEY_NAME --node $AKASH_NODE --chain-id $AKASH_CHAIN_ID --fees $FEES -y

# query bid 查询竞价
# akash query market bid list --owner $ACCOUNT_ADDRESS --node $AKASH_NODE --state open

# verify the deployment is runing 验证部署是否开启
# akash query deployment get --owner $ACCOUNT_ADDRESS --node $AKASH_NODE --dseq $DSEQ

# create lease 创建租约
# akash tx market lease create --broadcast-mode async --provider $PROVIDER --dseq $DSEQ --gseq $GSEQ --oseq $OSEQ --node $AKASH_NODE --owner $ACCOUNT_ADDRESS --from $KEY_NAME --chain-id $AKASH_CHAIN_ID --fees $FEES -y

# send manifest 发送清单文件
# akash provider send-manifest $DEPLOY_YML --from $KEY_NAME --home ~/.akash --node $AKASH_NODE --dseq $DSEQ --provider $PROVIDER

# check tx status 查看交易状态
# akash query tx $TX --node "$AKASH_NODE" --chain-id $AKASH_CHAIN_ID

# close deployment 关闭部署
# akash tx deployment close --node $AKASH_NODE --chain-id $AKASH_CHAIN_ID --gas 500000 \
# --broadcast-mode sync --dseq $DSEQ --owner $ACCOUNT_ADDRESS --from $KEY_NAME \
# --fees $FEES -y

# query service information 查询服务的信息,可获得服务web地址
# akash provider lease-status --node $AKASH_NODE --from $KEY_NAME --dseq $DSEQ --home ~/.akash --provider $PROVIDER

# Query the logs of the container run to see the program status 查询容器运行的日志,查看程序状态
# akash provider lease-logs --node $AKASH_NODE --from $KEY_NAME --dseq $DSEQ --home ~/.akash --provider $PROVIDER

# Query the log of container creation for locating problems 查询容器创建的日志,用于定位问题
# akash provider lease-events --node $AKASH_NODE --from $KEY_NAME --dseq $DSEQ --home ~/.akash --provider $PROVIDER
Part2: use Skynet in Application Development
Skynet is a decentralized storage hosting platform to which you can store various types of files. This article introduces two of the uses of Skynet: 1. How to use Skynet SDK to store NFT resources 2. How to automatically deploy websites with handshake links via Github Action.
How to use Skynet SDK to store NFT resources
My application has a feature that enables users to upload images and then generate an NFT, the URL of which points to the path where the images are stored.
There are 2 solutions here, one is to convert to base64 and store it directly into the contract, the advantage is easy to implement and resources are not lost easily. The disadvantage is that on-chain storage is expensive, and each request will get the full data, and the client cannot use the cache which causes slow loading.
The second is the use of decentralized storage, commonly IPFS and Arweave, Skynet also has the same function.
My application storage NFT takes the second way to do it.
The full code is in app/src/common/createpackage/index.jsx, the core parts of Skynet are as follows.
This is a js react component with a button to click to upload a file to be stored in Skynet and return Skylink (the URL to access the file).
Part of DOM code:
<div className="input">
    <Upload
      listType="picture"
      maxCount={1}
      beforeUpload={this.beforeUpload}
      onChange={this.handleChange}
    >
      <Button icon={<UploadOutlined />}>
        <FormattedMessage
          id='UploadPng'
          defaultMessage="Upload png only"
        />
      </Button>
    </Upload>
  </div>
Upload is antd's component for uploading files. beforeUpload is a hook function that performs a simple file format check before uploading.
onChange is the callback function after upload. The main Skynet related code is written in onChange.
import { SkynetClient } from "Skynet-js";
const client = new SkynetClient("https://siasky.net")

/* Omitted */

   async handleChange(file) {
    console.log(file.file)
    try {
      // upload
      const fileString = file.file
      const { skylink } = await client.uploadFile(fileString);
      const portalUrl = await client.getSkylinkUrl(skylink);
      await this.props.handleChangeNFT(portalUrl)
    } catch (error) {
      console.log(error)
    }
  }
The most important code is only 4 lines, and it is easy to get the Url of the file after uploading it to Skynet.
impo
rt { SkynetClient } from "Skynet-js";
const client = new SkynetClient("https://siasky.net")

const { skylink } = await client.uploadFile(fileString);
const portalUrl = await client.getSkylinkUrl(skylink);
Just get the Url and send it to the function that builds NFT. The speed in mainland China is about 3 seconds to read the image.
How to automatically deploy a website with handshake links via Github Action
Web applications have different build command depending on the framework, and a folder with static files is generated after running. Deploying static files can be hosted on platforms such as vercel, GitHub Page, Fleek, etc. It is also possible to start an nginx container with Akash to run it. Skynet also has similar functionality, and the specific process is described below.
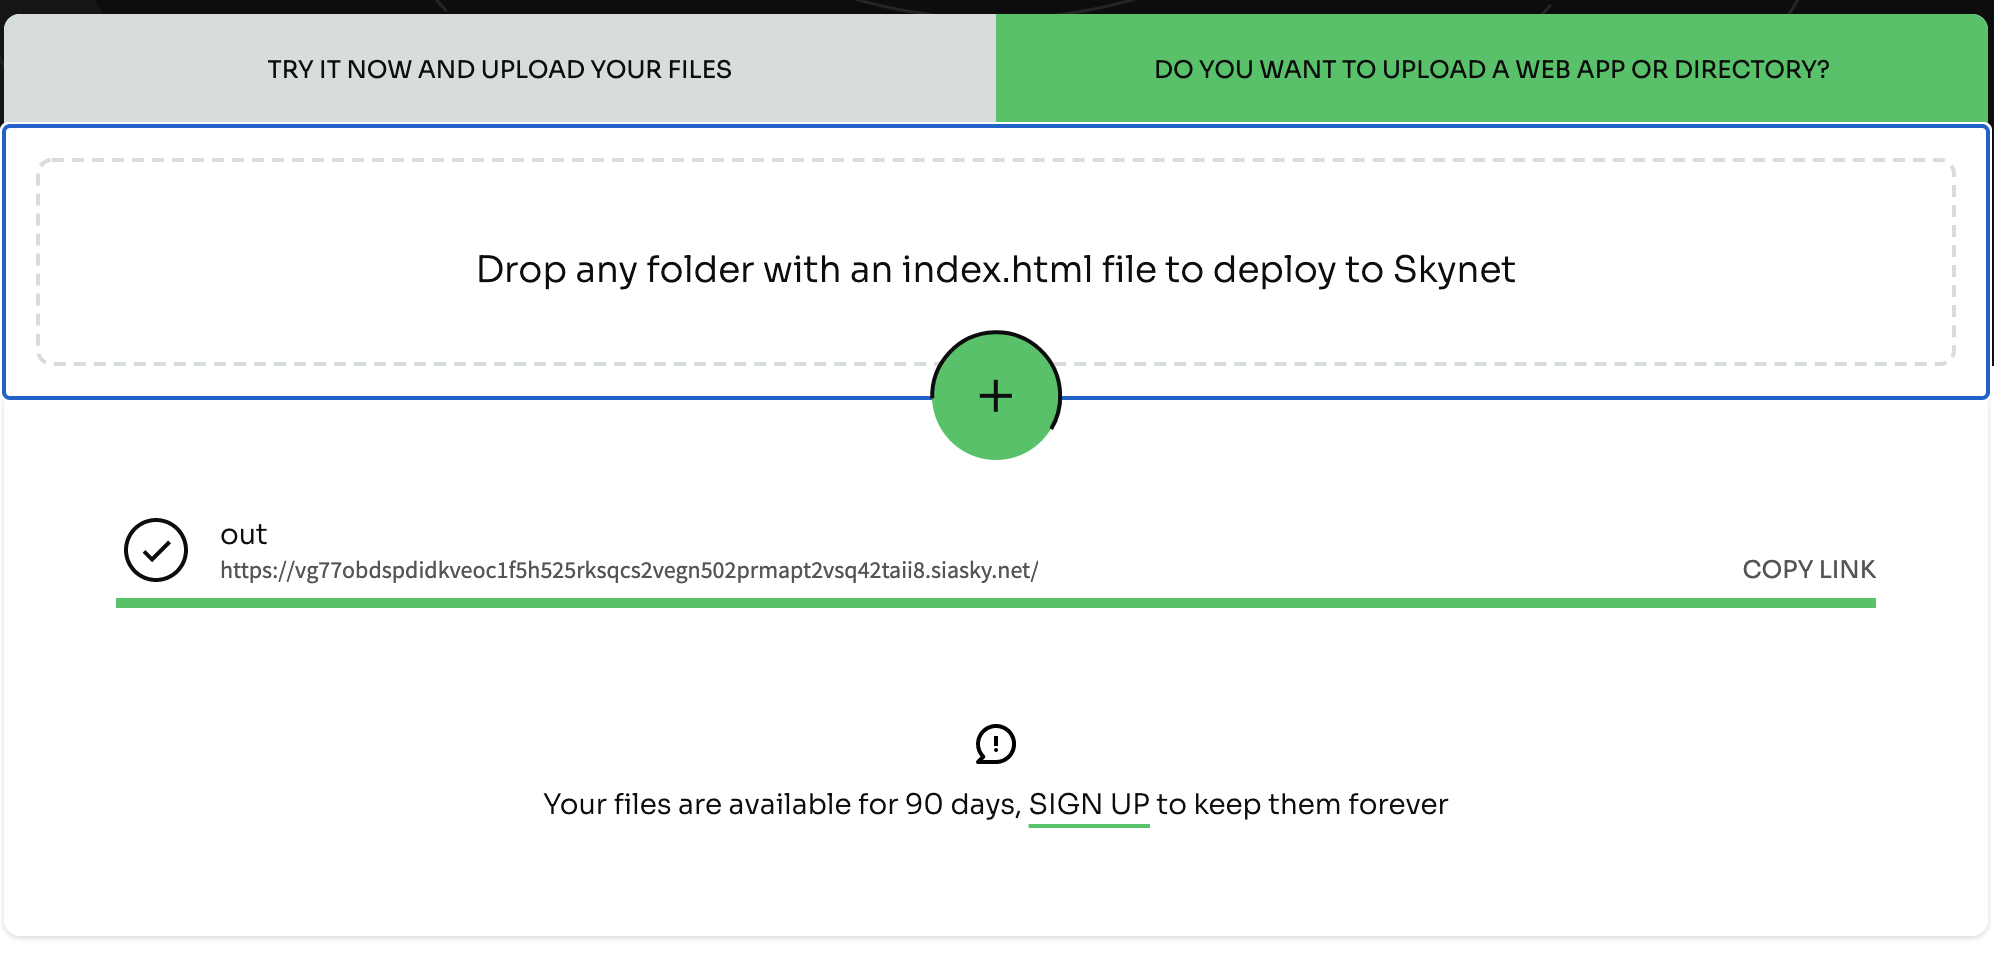
This site is written by next. The next build && next export command generates an out folder containing all the static files of the web page.
Visit https://siasky.net/, the home page has a Do you want to upload a web app or directory?, upload the out folder, you can directly through the generated skylink link [https:// vg77obdspdidkveoc1f5h525rksqcs2vegn502prmapt2vsq42taii8.siasky.net/](https:// vg77obdspdidkveoc1f5h525rksqcs2vegn502prmapt2vsq42taii8.siasky.net/) Visit the page now.
Of course, you can also automate the process by using GitHub Action to automatically build and upload the code to Skynet after it is uploaded.
Refer kwypchlo/deploy-to-Skynet-action to set the action
- Create a .github/workflow folder in the project root directory and create a new .yaml file under that file
- Open the GitHub repository page, select Settings/Secrets, and create a new random password named REGISTRY_SEED.
- Fill in the following code into the yaml
name: FanNFT to Skynet
on:
  pull_request:
  push:
    branches: [main]

jobs:
  build:
    runs-on: ubuntu-latest

    steps:
      - uses: actions/checkout@v2
      - name: Use Node.js
        uses: actions/setup-node@v1
        with:
          node-version: 14.x

      - name: Install dependencies
        run: yarn
        working-directory: guide

      - name: Build webapp
        run: yarn build
        working-directory: guide

      - name: Deploy to Skynet
        uses: kwypchlo/deploy-to-Skynet-action@main
        with:
          upload-dir: guide/out
          github-token: ${{ secrets.GITHUB_TOKEN }}
          registry-seed: ${{ github.event_name == 'push' && github.ref == 'refs/heads/main' && secrets.REGISTRY_SEED || '' }}
Where name, branches, working-directory, upload-dir are set according to your actual situation.
When finished commit and push the code, you can see the Build in the Action page and get the skylink and skyns entry.
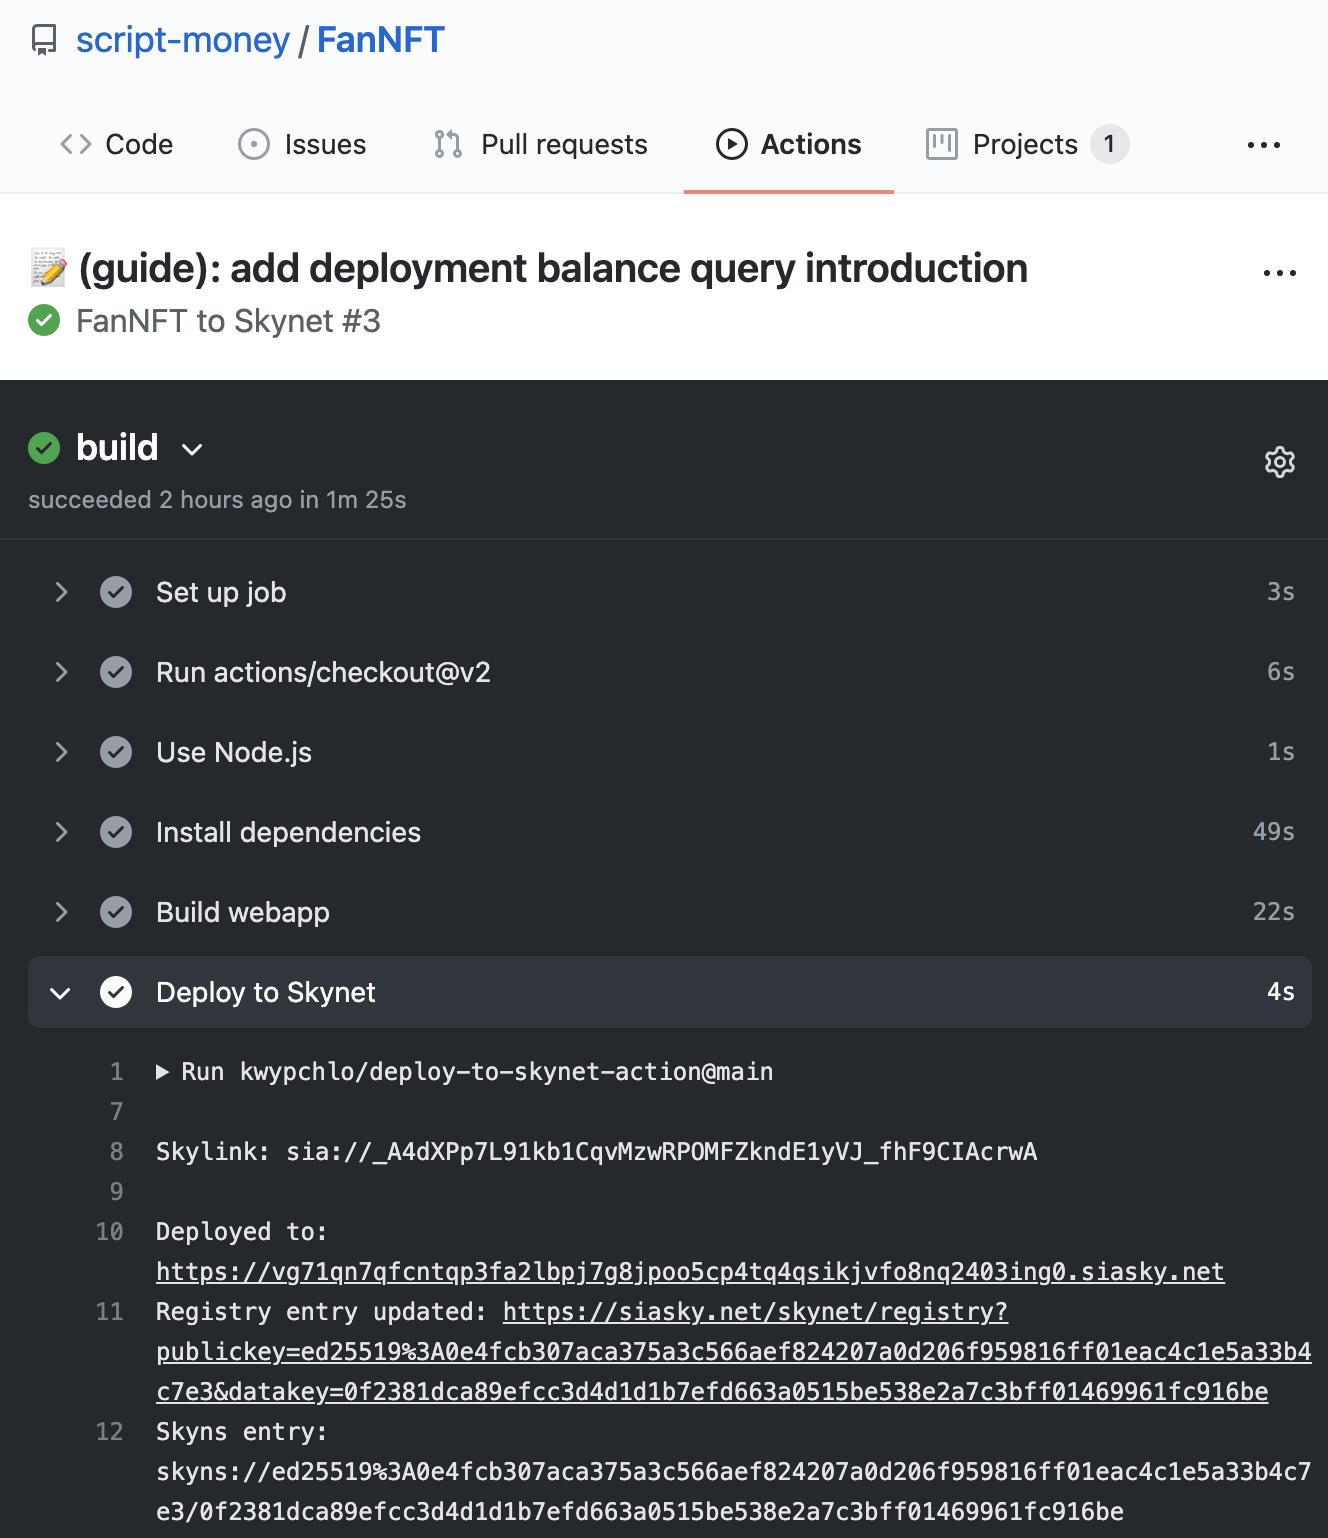
Because Skylink is generated based on the file content, similar to md5, if you modify the file, the link will change. If you bind a domain name, you need to change the address the domain name points to in order to access it properly.
But skyns is not changed, so you need to tie the hns domain to Skyns, every time you update jiu can use the same link to access. See handshake-names for details
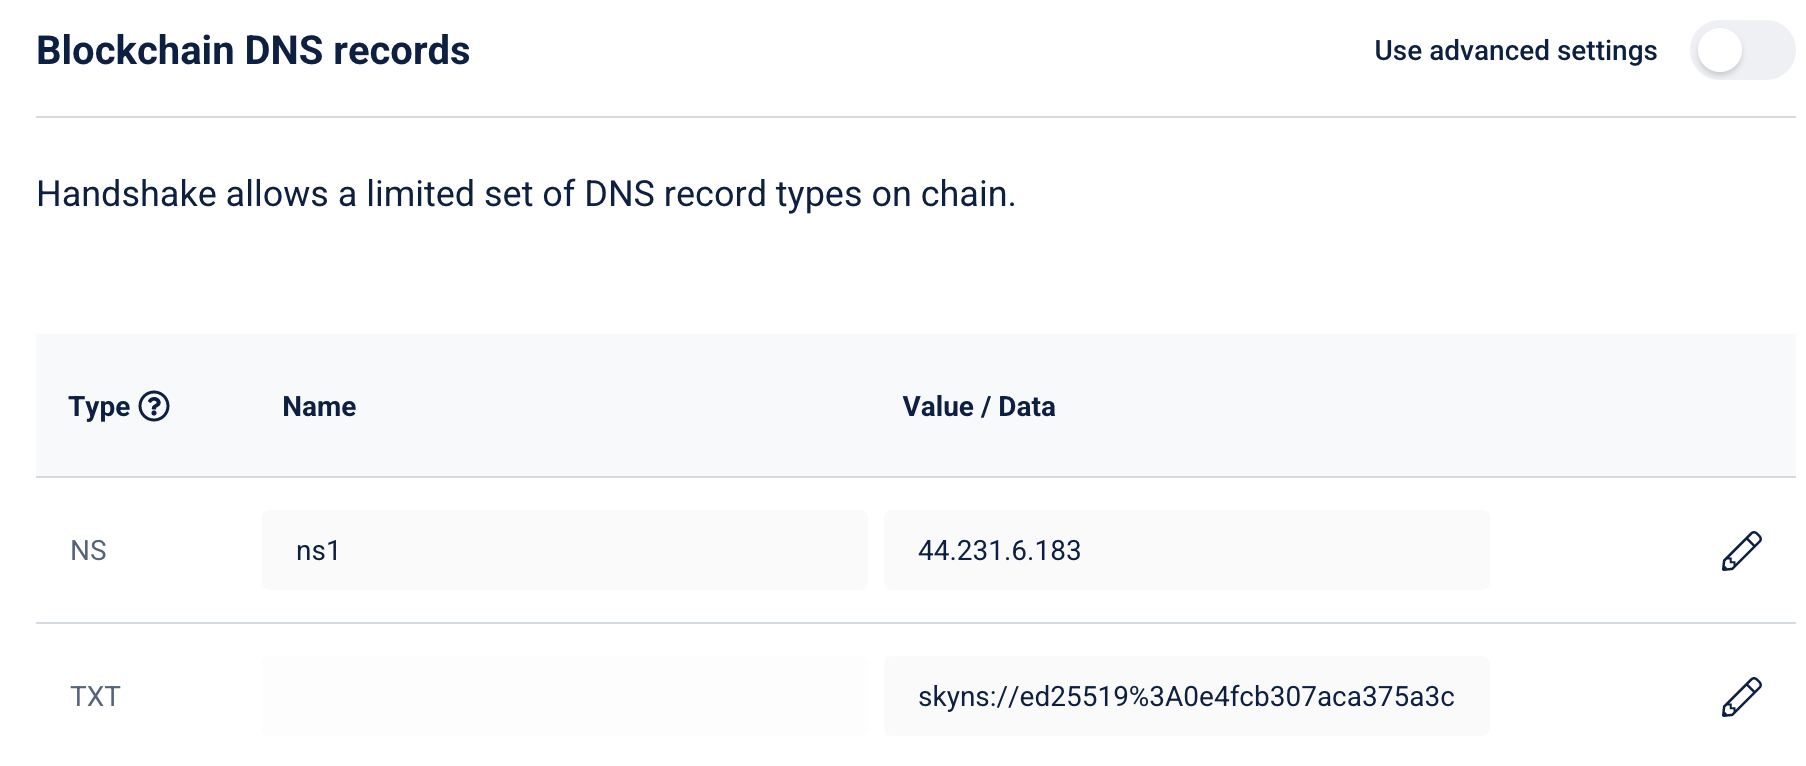
But skyns is not changing, so you need to bind the hns domain to Skyns, and you can access it with the same link every time you update. See handshake-names for details
Skynet also has a skydb feature, which you can treat as a decentralized key-value store database, with value pointing to Skylink. There is also an ecosystem project called FileBase, which uses Skynet as the underlying layer and can be used as a highly available cloud database. These are all features that may be used in traditional application development, and with projects like Skynet, they can be easily migrated to dWeb.